Pages

Friday, June 25, 2010

Tutorial: Drawstring Wet Bag

This is a perfect, quick project for taking your suits on all those trips to and from the pool and beach.  The bag is lined with a water resistant fabric that lets you throw your wet suits in this bag and not get everything else in you pool bag soaking wet.  You can make these in any size you want you'll just have to adjust the measurement to suit your needs.  Here we go...

Materials:
  • 34 x 12 rectangle of fabric for the outside of your bag (I used a sand dollar fabric)
  • 2 rectangles of 16.5 x 12 PUL (polyurethane laminated fabric) bought at my local Joann's Fabrics
  • 1 yard of nylon cording for the drawstring
  • 1 cord stop
  • coordinating thread
After you have your 3 rectangles cut, place the outside fabric right side up.  Then place your PUL fabric right side down at each end and pin the two ends in place. There will be an inch gap in the middle, as shown above.  Sew each end.

Take your super long rectangle and fold it in half with right sides together.  From the fold measure up 13 1/2 inches and put a pin on the edge.  Then measure 3/4 inch from that pin and place another pin.  This will be the opening to pull the drawstring through.  You will not sew this gap closed!!!

After securing your fabric with pins, it's time to get sewing.  Sew along the 3 sides leaving the drawsting opening and the opening to turn your bag right side out at the end of the PUL fabric.  Remember to back stitch on each side of the openings to give it some extra strength.

Turn your bag right side out.  To close the opening in the PUL fabric, top stitch across that end of the bag from end to end.

Tuck your PUL lining into the bag.  Because your PUL fabric is a little shorter than the outer fabric, you need to work the lining down in the bag.  Now it's time to sew the casing for the drawsting.  Simply find the opening on the side and sew 2 straight lines on each side all the way around the bag.  Make sure to back stitch where the opening is.  (Don't sew the bag with the cording in...I forgot to take a picture of this step until I was done with the bag :o)


After your casing is sewn, use a safety pin to feed the cording through the bag.  I used a lighter to seal the ends of the cording to prevent fraying.  Thread your cord stop through and ta-da!  You have a stylish water proof bag to tote around your wet suits all summer long.  This finished bag measures about 11 x 16 and can hold a couple kiddie suits and maybe an adult suit.  You would need to make a bigger one for the entire family though.

PS.  Don't put this bag in the dryer or you'll have a stuck together mess.  It is safe to throw in the washing machine though. Oh and you shouldn't iron the lining either.  You could pull the lining out to iron the outside fabric if it gets too wrinkly for your taste.  Happy sewing!!

Thursday, June 24, 2010

Quiet Time Coloring


More super cute coloring pages over at Vale Design.  Her coloring pages are always so cute and just the thing for a few quiet moments for mommy.  These work great while I'm trying to fix dinner.  If I give her some stickers too, she's in heaven and quiet for a whole 10 minutes...15 if I'm lucky!

Tuesday, June 22, 2010

Magic and Pizza


Friday night we visited the Magic House with some friends and their littles.  We had a blast.  The Magic House is a great place for exploring and all our kids are reaching the age where they really have started to enjoy the Magic House.  Every 3rd Friday night from 5:30 to 9:00 you can get in for free with your family.  Just thought I would pass that along to all the fellow St. Louisians looking for something free to do.  We made it for about 2 hours and then a few meltdowns started to happen, so we opted for some pizza down the street.  Steve and I had never been to Dewey's Pizza so I wanted to try it out.  The pizza was fantastic and the kids were so good.  We were out chatting and eating until after 9:30 with one of the other couples and their kids.  Ava was in seventh heaven.  She was so good at dinner and it looked like she was finally learning the secret to what grown-ups do after they put the kids to bed and she was LOVING it.  She was giddy that we were still up when it was dark out and she was with her friends!  Steve and I left that night saying we are definitely doing more things like to fill the rest of our summer nights.

Monday, June 21, 2010

A Moving Father's Day


Our Father's Day was busy but so rewarding.  We started the morning at church and then headed home to BBQ with my dad, brother and niece.  After spending a relaxing afternoon with my family we went back to church.  Once a year our church has a baptism celebration.  We are fairly new to the church so this was our first year attending.  We didn't know anyone being baptized but that didn't matter.  It was amazing and inspiring to see over 360 people being baptized and so excited to share it with everyone.  Everyone was cheering and clapping.  There were tears from family members as they watched their loved ones being baptized.  It was awesome.  Ava was cheering and clapping right along with everyone else.  It was a moving experience despite the 93 degree temperature yesterday.

Thursday, June 17, 2010

Packaging for Dad


Here is a quick and easy father's day idea to stash some of dad's favorite candies or any other small gifts for his special day.  Over at Paper Crave there is a great tutorial for making these little gift boxes with templetes too.  So cute and quick to whip up.  Happy crafting!

Wednesday, June 16, 2010

Simple Father's Day Gift


This year for Father's Day I wanted Ava to help make something that Steve could take to work or put on his desk here at home.  I ran across an idea on Martha Stewart's website that I tweaked a little for this project.
  1. Print off the DAD template from Martha's site.  I printed mine on cardstock so it was a little more sturdy to work with.  Cut out the templete very neatly.
  2. Print out 3 of your favorite pictures of your kiddos.  They will need to be rather small.  That's why I would print out the templete first so you can get an idea of how big the photos need to be.  Since we only have 1 kiddo, it was all Ava in all 3. 
  3. Put your photos behind the template and lightly trace so you know about how big to cut the photos.  Cut out photos and then use double sided tape to mount the photos to the DAD cutout.
  4. Mount on your favorite color cardstock and then add your artwork to a 5x7 frame.  I was going to have Ava color the background but she was not the least bit interested.  This turned out to be more of a mommy project than an Ava project...oh well.  You could also use an 8x10 frame and there would be more room for the kiddos' artwork. 
Hope that inspired you to get your little ones working on something special for their Dada!

Monday, June 14, 2010

The New Captain Kangaroo??


Our dear Simon, the lionhead, is constantly reinventing his look.  You know  like Madonna or Lady Gaga.  When we first brought him home, he had this cute little mohawk right between his ears.  He then started to get his lion mane around his head.  His latest and by far my favorite look so far is his far out 70's inspired porkchop side burns.  My  mom saw him and said he looked like Captain Kangaroo.  I couldn't get a good shot of them with his ears standing up but trust me it's hilarious.

On a different note, since summer is in full swing my posts will be fewer.  We've been so busy and blogging has fallen down a little on the list.  I do have a quick and easy father's day project coming to share this week though so stayed tuned for that.  Also, I made a few design changes to the blog so if you're in google reader or blogger click on over and let me know what you think.

Friday, June 11, 2010

Book Club: The Book Thief by Markus Zusak

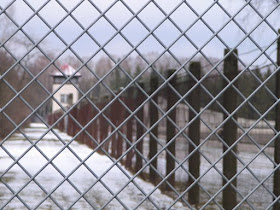
From the outside of Dachau, a Nazi concentration camp, looking in.


"Work makes one free."


"Think about how we died here."

Memorial Sculpture

Why the depressing pictures?  Read on...

This was a really good book.  It's the story of a young girl named Liesel in Germany who is sent to live with foster parents during World War II.  The family takes in a young Jewish man and Liesel has to keep her new family's secret. The unique twist on this story is that it is told from Death's perspective.  Death has followed Liesel throughout her life because he has a soft spot for her and her books.  Her life has been riddled with tragedy and heartbreak and what Death finds interesting about her is her love for words and books.  It's a story about people and their relationships, the power of words and books.  This story is so touching. I was sad that I couldn't keep reading about all the characters.  I felt like I knew them.  I would recommend this book to anyone and everyone.  I really, truly enjoyed it.   Almost everyone in our book club really liked this book. 

The pictures above are from our trip to Germany a few years ago.  We visited Dachau which is a concentration camp outside of Munich.  That concentration camp was brought up several times throughout this book.  I think the fact that I have been there brought out more emotions than I expected.  As I was uploading those pictures I got goose bumps and teary-eyed all over again like we were standing there again.  You can feel the pain in sorrow in that terrible place.  That was a horrible time in the world's past that will never be forgotten.

Next month...The Help by Kathryn Stockett.

Tuesday, June 8, 2010

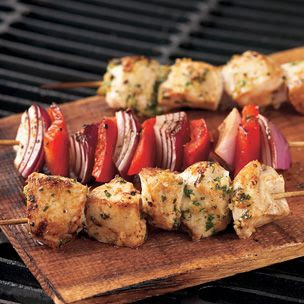
Recipe: Garlic Lemon Chicken Kabobs

Photo from Williams Sonoma

These kabobs made an appearance for a last minute meal with company on Friday night.  They were super easy, very flavorful and a big hit with everyone.  I served the chicken with tzatziki sauce bought from the store and a tomato, feta and cucumber salad similar the recipe on Annie's Eats.  It was a light, summery meal that disappeared before I had a chance to take pictures of it.  Trust me it was so yummy!  The recipe is from Annie's Eats fabulous site which was modified from a Williams Sonoma recipe.

Garlic Lemon Chicken Kabobs
3 tbsp. extra-virgin olive oil

Zest of 1 lemon
3 cloves garlic, minced or pressed
1 tbsp. minced fresh parsley ( I used dried because that's what I had)
1 tsp. kosher salt
½ tsp. ground black pepper
1 lb. boneless, skinless chicken breasts, cut into ¾-inch pieces

Directions:


In a medium bowl, whisk together the olive oil, lemon zest, garlic, parsley, salt and pepper. Add the chicken pieces to the bowl and mix to coat with the marinade. Cover and refrigerate for at least 2 hours and up to 8 hours.

Prepare a medium fire in a grill. If using wooden skewers, soak them in water for at least 20 minutes before use.

Thread the chicken pieces onto skewers and discard the excess marinade. Lightly oil the grill grates. Place the kabobs on the grill, cover, and cook until the chicken is opaque throughout, about 8-12 minutes, turning once or twice during cooking. Transfer to a warmed platter and serve immediately.

Monday, June 7, 2010

What Every Fashionable Seamstress Needs


From Namolio


I can't get over just how cute these all are.  I would hate to stick a pin in them!  I am really trying to justify the linen pincushion from Namolio.  She really does beautiful crochet work not only on pincushions but hair pins, brooches, scarves, etc. 

Friday, June 4, 2010

Living Life


Sometimes your plans just get pushed aside to live life in the moment.  I've had all these crafty endeavors on my list like making Ava a doll, wet bags for swimsuits, felt hair goodies, and the list goes on and on.  It has been so nice here and there has been so much going on lately that those things have been put on the back burner.  We've enjoyed lots of watermelon, a couple free outdoor concerts and lots and lots of water play in the back yard.  Nothing is better than watching your little one wiggle her behind to Erin Bode as the sun is setting with watermelon dripping down her face.  Living life with my little family is my most treasured blessing. 

Wednesday, June 2, 2010

"Toast, Peas"


We were sitting at breakfast this morning eating scrabbled eggs and toast.  Ava was eating eggs and sliced apple. Steve and I were talking about something and she says "Mama. Dada. Toast, peas."  She never ceases to amaze me with the things she picks up without letting us know.  I never knew the kid knew what toast was let alone that she could say toast.  She ate the rest of Steve's piece and requested another.  She proceeded to eat that entire piece too.  I think the yummy fruit spread helped.  Ever since we were in the UK last summer, we have a thing for jams and jellies.  Ava is loving it too as you can see by the looks of her messy face!

Tuesday, June 1, 2010

Big Plans

There is something so great about getting a package in the mail.  It makes me kinda giddy.  Friday I got a package full of gorgeous felt that started my weekend off right.  The color choices were endless and it was so hard to decide which colors not to buy.  I still haven't cut into it because it is so pretty as is.  I have big plans for all this glorious felt.  Give me a few days and then I'll have some crafty goodness to share.