Showing posts with label Tutorials. Show all posts

Thursday, September 2, 2010

Let the Sewing Resume


I just finished up a sewing project for a friend (Hi Amy!) that ended up taking me waaaay longer than it should have due to the baby and the constant sickness.  The patterns are nothing new but the fabrics are super cute so I thought I would share.  12 "green" snack bags and 2 drawstring swim bags in adorable fabrics...so fun.  Ava and I both think the farm animals are our favorites.  

Ava is my little assistant now for all sewing projects.  By assistant I mean kid who spreads all the fabric that's been cut all over the table and counts the cows, piggies, bugs, etc. while making the appropriate mooing and oinking noises.  At least she's working on counting skills, right?

Up next for sewing is a doll for Ava.  I'll share as I start to make some progress.  

Friday, June 25, 2010

Tutorial: Drawstring Wet Bag

This is a perfect, quick project for taking your suits on all those trips to and from the pool and beach.  The bag is lined with a water resistant fabric that lets you throw your wet suits in this bag and not get everything else in you pool bag soaking wet.  You can make these in any size you want you'll just have to adjust the measurement to suit your needs.  Here we go...

Materials:
  • 34 x 12 rectangle of fabric for the outside of your bag (I used a sand dollar fabric)
  • 2 rectangles of 16.5 x 12 PUL (polyurethane laminated fabric) bought at my local Joann's Fabrics
  • 1 yard of nylon cording for the drawstring
  • 1 cord stop
  • coordinating thread
After you have your 3 rectangles cut, place the outside fabric right side up.  Then place your PUL fabric right side down at each end and pin the two ends in place. There will be an inch gap in the middle, as shown above.  Sew each end.

Take your super long rectangle and fold it in half with right sides together.  From the fold measure up 13 1/2 inches and put a pin on the edge.  Then measure 3/4 inch from that pin and place another pin.  This will be the opening to pull the drawstring through.  You will not sew this gap closed!!!

After securing your fabric with pins, it's time to get sewing.  Sew along the 3 sides leaving the drawsting opening and the opening to turn your bag right side out at the end of the PUL fabric.  Remember to back stitch on each side of the openings to give it some extra strength.

Turn your bag right side out.  To close the opening in the PUL fabric, top stitch across that end of the bag from end to end.

Tuck your PUL lining into the bag.  Because your PUL fabric is a little shorter than the outer fabric, you need to work the lining down in the bag.  Now it's time to sew the casing for the drawsting.  Simply find the opening on the side and sew 2 straight lines on each side all the way around the bag.  Make sure to back stitch where the opening is.  (Don't sew the bag with the cording in...I forgot to take a picture of this step until I was done with the bag :o)


After your casing is sewn, use a safety pin to feed the cording through the bag.  I used a lighter to seal the ends of the cording to prevent fraying.  Thread your cord stop through and ta-da!  You have a stylish water proof bag to tote around your wet suits all summer long.  This finished bag measures about 11 x 16 and can hold a couple kiddie suits and maybe an adult suit.  You would need to make a bigger one for the entire family though.

PS.  Don't put this bag in the dryer or you'll have a stuck together mess.  It is safe to throw in the washing machine though. Oh and you shouldn't iron the lining either.  You could pull the lining out to iron the outside fabric if it gets too wrinkly for your taste.  Happy sewing!!

Monday, May 3, 2010

Tutorial: "Green" Snack Bags

This project started with an urgent email from a friend (Hi Valerie!) about making some party favors for her two adorable sons.  She knew she wanted some hot/cold packs made out of dino print and something else that would ship well and not weigh a ton because it was going to London.  I had seen these here and here and thought they were adorable.  They went on my to-make list and I just hadn't gotten around to them yet.  Here was my chance. 

~These are very easy to make in assembly style fashion so keep that in mind and make more than you think you need.  There are so many uses for these little cuties!!~

Materials:
cotton fabric
unbleached muslin for the lining
sew on velcro

Cut your fabrics into 12 x 7 rectangles. I was able to double my fabric and cut 2 panels out at a time with my rotary cutter.  Cut your velcro into 5 1/2 inch strips.  Use whatever width velcro you like.  I choose a skinny one so little hands could easily get it open.  If you can only get your hands on the wider stuff then just cut it in half.


With your fabrics facing right sides together, pin and sew both 7 inch sides using 1/4 inch seam allowance.  Press your seams to the patterned side.  Then turn you fabric the right side out and press again.


With your nicely pressed rectangle in front of you muslin side up, place your velcro on each side of the 7 inch side.  Velcro was a booger to pin through so I used used a large paper clip to hold it in place and it worked out great.  Just eyeball where it should be.  I decided to use a zigzag stitch to secure the velcro because I was using skinny pieces.  If you are using wider velcro you would want to opt for sewing around the edges of the velcro.  I also changed my needle to something a little heavier to plow through that velcro.


I ended up really liking how the stitch looked on the outside of the bags.


Fold your fabric right sides together again and pin along the sides.  Sew along the sides to close up your little bag.


To keep the fabric from fraying, sew a zigzag stich along the sides.  Trim away any stray fibers.  You can see there is still a stray on my photo...whoops!


Turn right side out and ta-da!!  You now have the cutest little velcro bag.


WATCH OUT THEY MULTIPLY! 
See the little dino packs too.  So cute and easy to make as well.


You can make these in any size and use them for any purpose other than snacks. 

~Make one to throw in your purse to hold your lip gloss and chapstick.
~Put your little guys cars in it to take to a friends house.
~Tote around crayons and stickers to keep your little one busy at the doctor's office.
~Throw out the bulky puzzle boxes and store the pieces in one of these little guys instead.
~I loved Emily's idea of putting M&Ms in it to take to the movies.


With so many cute fabrics you can go nuts making these.  I'd love to hear your ideas of what you would use these pouches for. 

Happy Sewing!

Thursday, April 22, 2010

Tutorial: Twisted Flowers

Here are some fun flowers to whip up as pins, clips, headbands, or really anything that needs a flower!  Here's what you need:


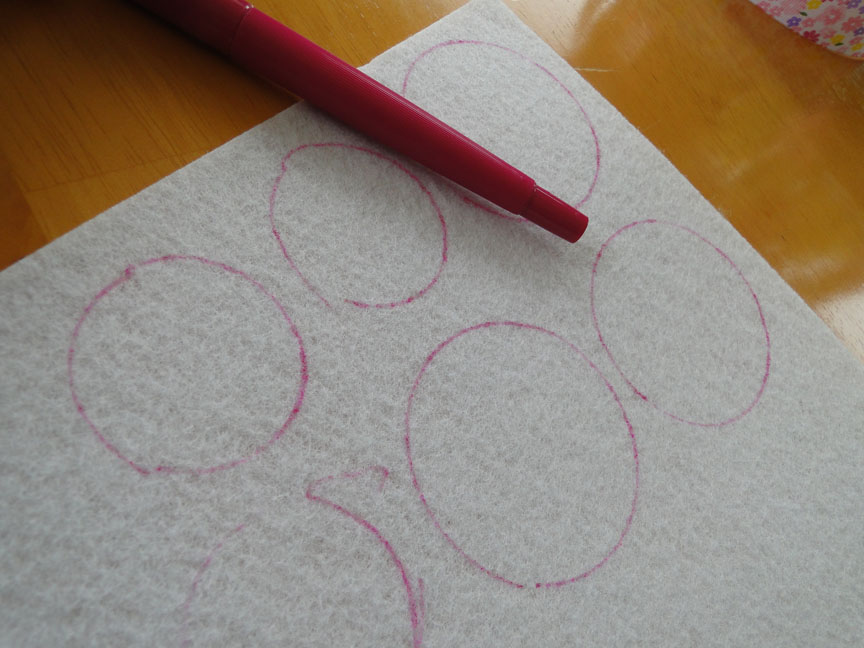
1.  Using the felt tipped marker trace several circles on the felt.  Cut out all your circles just inside the line and set aside.  I did a lot at once just so I wouldn't have to do this over if I wanted to make more.  I found the stiff felt at Michael's right next to the normal felt. 

2.  Cut a length of ribbon, about 2 feet or so, and using a lighter seal the ends of the ribbon.  This prevents fraying later.  Tie a knot at one end of the ribbon as close to the end as possible.
 

3.  Hot glue the knot to the center of a felt circle.

4.  Now comes the part that takes a little practice.  Take the ribbon and start twisting.  You can twist tight or loose and get a different look with each flower.  I twist in the middle, I would say.  I twist a few inches then lay a bead of hot glue and press the twisted ribbon down.

5.  Keep twisting and glueing until you have reached the size flower that you want.  Trim extra ribbon, if you have any, and reseal the end with a lighter.  Make sure your flower is all glued down and trim excess felt from the back of the flower.  I added a strip of felt to the back of my flowers to slide onto headbands and barretts for Ava.

You can whip a bouquet of these up in a short amount of time.  Like during naptime perhaps!  I even made a few with strips of fabric, too.  Very shabby chic!  These would be so cute as pins on purses or scarves.  As with anything, the more you make the better they start to look and the less hot glue you see :o)  Happy flowering everyone!

Tuesday, March 30, 2010

Tutorial: Fabric Flowers

Here is my version of the fabric flower.  I tried to make these directions as easy to follow as possible but ask questions if something doesn't make sense!


  1. Gather all your supplies.  My fabric strips are 10 inches long and 1 inch wide.  My strips happen to have a pinked edge from a layer cake I used for Ava's quilt.  If you want a finished edge use a piece of fabric that is 10 inches long and 2 inches wide.  Then fold the fabric in half length wise and iron your fold, so now you have a 10 inch x 1 inch piece of fabric like the below picture.

2.  Stitch along the edge of the fabric that will be the center of the flower using a gather stitch.

3.  Gather your embroidery floss tight and tie at least a double knot very securely.  Trim the end of your floss so that you can't see it. 

4.  You will be left with a cute little flower ready to be embellished a zillion different ways.

5.  Hot glue the button of your choice to the center.  You could also do a felt center or really anything to cover the center that tickles your fancy.

6.  Now is where you can make your flower into a clip, a pin, or even a ponytail holder.  I made Ava's into clips.  I bought my clips from Sally's Beauty Supply Store for about $2.50 for 12.  Hot glue your ribbon to the clip.  Glue and wrap the entire outside of the metal clip.  The ribbon also helps the clip stay in her hair.

7.  Hot glue your flower to the clip and you're done!  Super easy right?

Here are 2 of the clips I made.  The flower on the left was made with 10 inches of fabric and the flower on the right was made with 20 inches of fabric.  These are very forgiving flowers so go crazy and experiment with different lengths & widths.  You could make these with a wide ribbon, felt, etc.  The possiblilities really are endless.  Check out Katie's idea of using these to make a spring wreath.
Now go crazy with these fabric flowers and let me know how it goes!!